Lesson 5: Importing Customers
Customers can be entered into MVP in two ways: manually or by importing a list. To import a list, it has to be a CSV (Comma Separated Values) spreadsheet and you must have the first and last name and the full address. See our required formatting section for more information.
Video guide coming soon! In the meantime, check out the written instructions below.
Steps to Import Customers
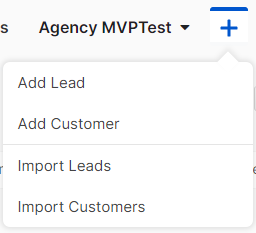
1. In the top right corner near your name, click the + symbol, then choose “Import Customers” from the dropdown menu.
2. Click the Select file button to upload your .CSV (comma separated values) file.
TIP: Download the Official Agency MVP Import Template to format your customer information.
3. Import Details – Choose a Lead Source, Tag, and User
-
- A Lead Source describes where your leads came from, choose the closest option.
- Choose or create a Marketing Source to track your ROI. (Example: Current Customers)
TIP: Marketing Sources in Agency MVP are not required but HIGHLY recommended. They will help you get more out of Agency MVP’s reports.
-
- Assign ownership.
- It defaults to you, but if another staff member should work these households, make sure to choose their name from the drop down.
- Assign ownership.
4. Map your column headers
- First, select the name format (see required formatting below)
- In the following drop-downs, you’ll see a list of your spreadsheet headers (this is the information provided in row 1 of your spreadsheet).
- Match the headers from your spreadsheet to each drop down in Agency MVP
- TIP: The titles do NOT have to match. Example: In MVP it says “First Name” but your spread sheet might only say “First” or MVP says “Postal Code” but your spreadsheet might say “Zip Code”
-
- The only required information is the first and last name and full address. The rest of the information is optional.
- The only required information is the first and last name and full address. The rest of the information is optional.
5. Map Existing Policies
-
- If you have any existing policy information on your spreadsheet, you may continue mapping the column headers in this section. THIS STEP IS NOT REQUIRED!
6. Assign Workflow (optional)
- If you would like to assign a workflow to this import, you can do so by choosing a Custom or X-Date workflow that you have created from the dropdown.
*NOTE: Be sure if you have included a TEXT CONSENT column on your spreadsheet and have filled it in with either YES or NO.
7. Begin Import
-
- When ready, click “Begin Import”
- When the import is complete, you’ll find the households on the customer call view page of the assigned owner (i.e. the staff member you assigned the list to).
Note: Imports may take up to 24 hours depending on file size.
*If you would like us to import your file for you, please fill out this form thoroughly
Click here to download an import template.
Required Formatting
Name
- There are 4 options for Name Format:
- First Last
- First, Last
- Last, First
- Separate Columns

Dates
- All dates must be formatted into a 2-digit month, 2-digit day, 4-digit year. This includes DOB, Renewal dates, and effective dates.
- Example: MM/DD/YYYY
- Tip: Right click on the column letter that the date is listed in, click Format Cells, click Custom, then type in mm/dd/yyyy where it says “General”
Phone Number
- You cannot have the parentheses in the phone numbers.
Mailing Address
- You must split the address amongst 4 columns:
- House number and street name
- City
- State (Abbreviate the state name. For example, “TX”)
- Zip Code (first five digits only)
